One Venue, Twelve Subjects: Headshot Studio Metadata in a Single Pass


The short answer
Headshot studio metadata is a per-subject problem, not a geo one: one location, many people. Drop one venue pin on the whole card, apply one copyright and one project reference to every frame, then split the day into subject groups and keyword each group separately. Jade GT runs that outer-loop, inner-loop pass in the browser before Lightroom opens. Nothing uploads.
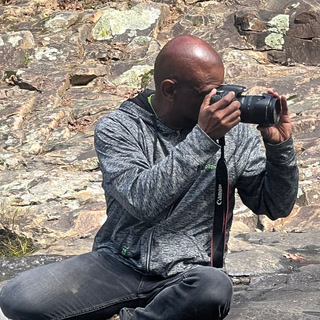
The corporate booking is for twelve people. One conference room turned into a pop-up studio, one gray seamless, one light that does not move all day. Each person steps in, gives you six to eight frames, and steps out. By four o'clock you have roughly 90 frames on the card and twelve names in your head that the card knows nothing about.
This is the studio photographer's version of the metadata problem, and it is the opposite of the wedding one. A wedding moves across a city and needs a GPS track. A headshot day never leaves the room. The location is a single pin you could drop with your eyes closed. What the files actually need is to know who is in them, and that answer changes every six frames.
A note on where this workflow comes from. I build metadata tooling, and I shoot architecture and street, not corporate headshots. The session structure below is assembled from how high-volume headshot pros describe their days in industry writeups: Sean Tucker's 90-second-to-two-minute per-subject system on PetaPixel, the Fstoppers high-volume playbook, and SLR Lounge's day-of-corporate-portraits guide. The metadata mechanics are mine; the workflow shape is theirs.
This post is about the right loop structure for that day: one outer pass for everything the whole card shares, then a short inner pass per subject.
Why is headshot studio metadata a per-subject problem, not a geo problem?
A travel or wedding shoot scatters frames across locations, so the hard metadata field is GPS. A studio day inverts that. The Tether Tools breakdown of high-volume versus individual sessions makes the split clear: solo sessions optimize for one client's curation in the moment, while volume days optimize for moving many subjects through one fixed setup fast.
When the setup is fixed, almost everything on the card is identical. Same room, same coordinate, same copyright string, same lens, same day. The SLR Lounge corporate-portraits guide describes shooting "a day of headshots where 50 people might step in front of the camera" without moving the lighting at all. Consistency is the whole point of the format.
So the metadata that varies is small and specific:
| Field | Varies per...? | Why |
|---|---|---|
| Venue / GPS coordinate | Never (whole day) | One room, one pin |
| Copyright notice | Never (studio default) | Same photographer all year |
| Job / project reference | Never (whole booking) | One client, one invoice |
| Subject name and keywords | Every subject | Twelve people, twelve folders |
| Filename | Every frame | Schema is fixed, sequence advances |
Everything in the "never" rows is an outer-loop job: type it once, apply it to all 90 frames. Only the subject name and keywords belong to the inner loop. Get that split right and a twelve-person day is one big pass plus twelve tiny ones, not twelve full passes.
What metadata does a headshot studio day actually need?
Here is the field list for a packaged session day, written to the IPTC and XMP blocks that Lightroom, Bridge, Capture One, and every delivery platform read natively. Friendly names are fine in conversation, but the field IDs below are what actually gets embedded, and what a stock or brand portal will look for later.
| Treatment | XMP property | Legacy IPTC (IIM) | Scope |
|---|---|---|---|
| Copyright notice | dc:rights |
2:116 | Whole day |
| Creator / photographer | dc:creator |
2:80 | Whole day |
| Job identifier (project ref) | photoshop:TransmissionReference |
2:103 | Whole booking |
| Special instruction (usage note) | photoshop:Instructions |
2:40 | Whole booking |
| Subject keywords | dc:subject |
2:25 | Per subject |
| GPS coordinate | EXIF GPSLatitude / GPSLongitude |
n/a | Whole day |
| Filename | file name on disk | n/a | Per frame |
Two of those deserve a flag. The job identifier, photoshop:TransmissionReference in the IPTC spec, is the field most studio shooters under-use. It is built "for the purpose of improved workflow handling," which is exactly what a multi-subject booking needs: a single project string like ACME-2026-Q2-HEADSHOTS stamped on all 90 frames so that six months from now you can pull the entire job back with one search. And the keyword field is dc:subject, a bag of text values, which is why you can stack a subject's name on top of shared tags without overwriting anything.
The copyright and credit fields are not just for your records. The IPTC quick guide to Google Images metadata confirms that Google reads dc:creator, dc:rights, and the credit line straight off the file and shows them in image search results. For commercial headshots that end up on a company's About page, that embedded attribution is the difference between a credited image and an orphaned one. (This is general workflow information, not legal advice; for licensing language, the ASMP copyright resources are the reference.) When a headshot day is a paid commercial booking with releases, the model and property release status fields a commercial delivery carries ride in this same pass.
How do you run the outer loop: everything the whole card shares?
The outer loop is one pass over all 90 frames. You type a handful of values once and apply them to the entire selection. Open Jade GT and drop the day's folder onto the page. Nothing uploads; the files stay on your disk.
1. Drop one venue pin
Open the Location tab, search the building address or drag the pin to the room, and apply it to every selected frame. One coordinate, 90 files, one click. The walkthrough is the same single-venue gesture covered in geotag photos without a GPS tracker: for a fixed location, the venue address is more precise than any GPS puck would have managed indoors anyway.
2. Stamp copyright and creator
Your dc:rights and dc:creator strings are saved from the last booking. Confirm them and move on. This is studio-default metadata; you set it once and it rides along on every job.
3. Set the project reference once
Type the booking's job string into the job identifier field, photoshop:TransmissionReference. Something like ACME-2026-06-HEADSHOTS. Optionally add a usage note in photoshop:Instructions ("Internal use, company directory and LinkedIn, no resale"). Both apply to all 90 frames. This is the single most useful thing you can do for future-you: it turns a pile of headshots into a searchable, named job.
4. Lock the rename schema
Pick one filename token pattern for the whole day and never touch it again. A schema like ACME_2026_Headshots_{subject}_{seq} gives you sort-safe, human-readable names. The full token reference lives in the rename section of the user guide, and filename schemas that survive a second-shooter handoff go deeper on token grammar and the sequence-counter overflow that bites on big sets. The schema is outer-loop; the subject token and sequence are what change in the inner loop.


After the outer loop, every frame on the card knows where it was taken, who shot it, who owns it, and which job it belongs to. The only thing left is who is in each one.
How do you run the inner loop: keywording each subject?
Now the day splits into subjects. Twelve people means twelve short bursts of frames, and the Fstoppers high-volume guide puts that at six to eight frames each in the typical setup. Your job is to attach the right subject name and keywords to each burst without re-touching the 80-odd frames that are not that person.
There are two ways to organize the inner loop, and the choice is real.
Keep all 90 frames in one folder. Select the first subject's six frames, add their name and any per-subject tags to dc:subject, then move to the next subject. The shared keywords you want on everyone (headshot, corporate, ACME, 2026) you apply once to the whole selection in the outer loop, because dc:subject is a bag: stacking a name on top does not erase the shared tags.
This keeps one flat folder, one rename sequence, and one searchable job. It is the better default for most volume days.
Split the card into twelve subfolders, one per person, and treat each as a mini-shoot. This feels tidy and maps cleanly to per-subject delivery galleries, but it fragments your rename sequence and makes the whole-job search harder. The ShootProof high-volume guide leans on a "repeatable workflow" and consistent organization for exactly this reason: every fork you add is another thing to keep consistent by hand.
Use folders only if your delivery platform demands per-subject uploads. Otherwise keep it flat and let the metadata do the sorting.
The practical rhythm, matched to the 90-second-to-two-minute-per-subject pace Sean Tucker describes, is: select burst, type name, apply, next. Twelve subjects at a few seconds of keywording each is a couple of minutes total, not a couple of hours.
Preview on ten frames before you commit
Before you run anything across the full card, Jade GT shows you the result on the first ten files: filenames, embedded dc:subject keywords, the venue pin, the job string. This is your "does the schema hold" moment. Catch a typo in the project reference here, not after it is stamped on 90 files.
Run the pass
One click. The shared outer-loop metadata and the per-subject keywords are written into every frame at once. A 90-frame headshot day finishes in the time it takes to refill your water.
How does RAW fit a high-volume headshot day?
Most working headshot pros shoot tethered RAW, and the volume guides assume it: Capture One tethering shows up in the Fstoppers workflow and small RAW files in the Tether Tools breakdown, specifically to keep transfer fast across many subjects.
Jade GT reads and writes metadata directly to RAW files from every major manufacturer, Canon CR3, Nikon NEF, Sony ARW, Fujifilm RAF, and the rest, so the keywords and copyright land in the file itself rather than a sidecar that can wander off. When you import into Lightroom or Capture One afterward, the subject names, the job reference, and the venue pin are already there. You start retouching, not re-tagging.
What this pass is not
Three edges to know before you swap anything out
- Not a culler. Pick your six keepers per subject in Photo Mechanic, Capture One, or whatever you already use. Jade GT runs before the cull.
- Not a retoucher. Skin work still happens in your editor of choice. This pass only touches metadata and filenames.
- Not a delivery platform. ShootProof and the rest still handle the per-subject galleries.
Jade GT sits in the gap between card-ingest and cull, does the outer-loop and inner-loop metadata in one drag, and gets out of the way. That is the whole job.
FAQ
Can I really keep all twelve subjects in one folder and still deliver per person?
Yes. The subject name lives in dc:subject on each frame, so any delivery tool that filters by keyword can split the job back into per-person galleries without you ever foldering by hand. Flat on disk, sorted by metadata.
What is the project reference field actually called?
The job identifier is photoshop:TransmissionReference (legacy IPTC 2:103), described in the spec as a value "for the purpose of improved workflow handling." Stamp one job string on the whole booking and the entire day comes back with one search later.
Does this work with tethered RAW from a corporate booking?
Yes. Jade GT writes metadata straight into RAW files from every major manufacturer, no sidecar required, so the keywords and copyright survive into Lightroom or Capture One.
Will my shared keywords get wiped when I add a subject name?
No. dc:subject is a bag of values. Apply the shared tags to the whole card in the outer loop, then stack each subject's name on their burst in the inner loop. Nothing overwrites.
Try it on one subject
You do not have to take my word for the loop structure. Grab one subject's worth of frames from your last booking, drop them into Jade GT, stamp the job reference and a name, and watch the preview. If the output is not what your next session day needed, close the tab and lose nothing.
If it is, your next twelve-person booking is already organized before the cull.
Sources
- PetaPixel: How to Do Corporate Headshot Photography (Sean Tucker)
- Fstoppers: Secrets to High-Quality and Efficient High-Volume Headshots
- ShootProof: How to Get Started with High-Volume Photography
- Tether Tools: Workflows for High-Volume vs. Individual Session Headshots
- SLR Lounge: Tips for Getting Through a Day of Corporate Portraits
- SLR Lounge: Mastering the Art of the Business Headshot
- IPTC Photo Metadata Standard (field specification)
- IPTC: Quick Guide to Photo Metadata and Google Images
- ASMP: Copyright and Professional Practices
- Headshot Crew: The Headshot Intensive (Peter Hurley)
- Photo Mechanic by Camera Bits
Shoot a high-volume session format I did not map here? Reply or email. The loop structure above comes from how the pros describe their days, and the next version comes from the days that did not fit.
Reply to Kenny
Questions, corrections, or a workflow story of your own? Send a note. It goes straight to my inbox.